If you've ever considered setting up your own Minecraft server but felt intimidated by the prospect of modifying files or dealing with complex terminology, don't worry. Creating your server is quite straightforward, as long as you follow the required steps and commands accurately. While getting your friends to connect to your server may present its challenges, we'll address that in a separate article. For now, let's concentrate on how to make a Minecraft server that can work.
Why should you make a Minecraft server on your own?
Creating your own Minecraft server provides unparalleled customization opportunities, including role assignment, object spawning control, and fine-tuning game physics. For parents, this means maintaining oversight of their children's online interactions.
Two primary methods exist for setting up a Minecraft server: utilizing a VPS provider or hosting it on your computer. While both require some technical proficiency, VPS hosting is generally more straightforward, with many web hosting services offering specialized Minecraft hosting solutions.
Each approach has its advantages and challenges. Hosting your server grants cost savings and full control but relies on your home internet quality and troubleshooting skills. Alternatively, using a web hosting service simplifies setup but comes with a higher cost.
Before heading to the step-by-step guidance on how to make a Minecraft server, let's lay the groundwork first.
How to make a Minecraft server: Things you need
The primary requirement is a stable Internet connection. Beyond that, you have two options: utilizing a dedicated web hosting service or hosting the server on your PC. If you go with a web host, you'll need the financial means to purchase and maintain server space. On the other hand, hosting on your own PC requires Minecraft Java Edition and some familiarity with command-line operations.
How Long Does It Take to Make a Minecraft Server?
This depends on your familiarity with web hosting services or file and command editing on a PC. Using web hosting services, it can take anywhere from a day for payment and server activation, but it could be as quick as an hour. Similarly, setting up a server on your PC can be done as soon as you download Minecraft Java Edition, provided you know how to configure everything. However, if you're new to the process, expect to spend an evening setting things up.
How to Make a Minecraft Server Using Hostinger
You can utilize almost any web hosting plan to make a Minecraft server, but some web hosts offer plans specifically tailored for this purpose. Examples include Amazon Web Services, Apex, and PebbleHost. One notable service is Hostinger, based in Lithuania, which provides streamlined and user-friendly Minecraft server hosting. Hostinger supports software mods like CraftBukkit and Spigot, and offers full root access, allowing you to install as many modpack JAR files as you need.

Your server needs will vary depending on factors like the size of your Minecraft world, the number of players connecting, and whether you intend to use mods. The primary considerations are RAM and virtual CPU allocation. The performance and capacity of your server largely hinge on the amount of memory allocated. For example, a server equipped with 2GB of RAM can handle up to 10 players without experiencing significant lag. Furthermore, the allocation of virtual CPUs directly affects gameplay, with more or higher-quality CPUs leading to improved performance.
If you're planning to play with a small group of friends, a basic hosting plan should suffice. However, if your goal is to build a larger community, investing in a high-end hosting subscription is crucial. While choosing a larger plan may entail a higher initial cost, Hostinger offers the convenience of easily upgrading from a lower-tier server to a higher one. For beginners, starting with a smaller plan and gradually scaling up as your needs grow may be a more sensible strategy.
Let's examine Hostinger's most budget-friendly option, the Alex plan. With this plan, you have the flexibility to select the Minecraft version you prefer, including the latest edition. Options include the Official Java version and the highly customizable Spigot version. The Alex plan provides 2GB of RAM and full root access for $15.95 per month. It's worth noting that introductory rates for first-time purchases are considerably lower. Additionally, opting for an annual plan substantially reduces the overall cost.
Now, are you ready to make a Minecraft server using Hostinger? Let's go!
1. Choose a Hosting Plan
Choose a hosting plan that aligns with the RAM requirements necessary to effectively run Minecraft for yourself and your guests. If you're unsure about the specific RAM needs, consult the Minecraft Wiki for helpful recommendations.
2. Set Up Your Minecraft Server
Upon purchasing a server from Hostinger, log into your account to initiate the setup process. Click on the Setup button and carefully follow the provided instructions. This includes creating a server name and setting up a root password. Once these steps are completed, you can access your Minecraft server from the VPS section of your account homepage.
3. Configure Your Minecraft Server
Hostinger provides a Game Panel with all Minecraft plans for simple game management. Start your server by selecting "Start" in the Server Management section. Once your server is running, navigate to "Other Settings" within the Server Management section to adjust configurations as needed. Hostinger recommends using the Debian 10 operating system with Game Panel, granting access to the dashboard. Login credentials can be found in the Notes section for your convenience.
4. Log Into Your Minecraft Server
In the Server Management section, choose "Login Details" from the Template Details. Click on the Login URL to access the login page. Input the login credentials provided in the Notes section. This will direct you to the Game Panel dashboard.
5. Create an Instance
Once you're in the Game Panel, click on the Create Instance icon. Choose the Minecraft Edition you prefer (typically Minecraft Java Edition for PC), then press Create Instance. After the server setup process finishes, click on your instance and select Manage. Choose Start, accept the Minecraft EULA, and then Start again to initiate the server. You can connect to it using the Endpoint information, accessible in the Manage section.
That's all! Enjoy your newly hosted Minecraft server and share the IP address with friends to join you in the awaiting adventures.
How to make a Minecraft Server on your PC
If you're interested in creating a Minecraft server on your PC and prefer a more hands-on approach, the process becomes slightly more complex. While you can set up a Minecraft server on a PC running Linux or Mac OS, the general steps are similar. However, in this guide, we'll walk you through the process tailored specifically for a Windows PC.
To begin hosting a Minecraft server on your PC, you'll require several crucial software components. Foremost, you'll need Minecraft Java Edition. It's crucial to note that if you possess any other Minecraft version, such as the console or Windows 10 editions, you won't be able to host your custom server. Once you get Minecraft Java Edition, ensure Java is installed on your PC, or update it to the latest version (if needed).
- Go to the Java Devkit page, and search for Windows x64 Installer.
- Download the link, tick the Terms of Service, and run the file when the download is finished.
- Run the file to initiate the installation wizard. Follow the on-screen instructions to proceed with the installation, and once it's complete, close the window to finish the process.
Create a Folder & Download the JAR File
Once you get the latest version of Minecraft Java Edition, you can right away get started on the server. To simplify the process, create a dedicated folder to store all your server files. This folder will help keep your server setup organized and easily accessible.
To create a folder on your desktop:
- Right-click on your desktop.
- Scroll down to "New" and select "Folder."
- Give the folder a name of your choice. For this example, let's name it "Server."
Now, you must get some additional key files, including the server JAR file by following these steps:
- Visit Minecraft's official website.
- Find the Server Software section, and then the Java Edition Server link to download it.
- Once the download is finished, drag it into the Server folder.
Navigate to the Server folder, where you'll find the server.jar file. While you could simply click on the file to generate all the necessary additional files, it's advisable not to do so. Instead, you'll create a batch file, essentially a script that initiates the server for us. This approach is preferred because it allows you to specify commands as required and identify any errors via the command window. Contrary to how it may seem, creating a batch file is straightforward. The instructions to do so can be found on the server.jar download page.
Create a Batch File
- Right-click the inside of the Server folder. Select New, and then Text Document.
- Set a name.
- Right-click Startup, and select Edit. A notepad window should open. Here, you'll write the batch script. On the Minecraft download page, the suggested command is as follows: java -Xmx1024M -Xms1024M -jar minecraft_server.1.19.3.jar nogui
This command instructs Java to allocate 1024 megabytes of memory as minimum and maximum to the Minecraft server.jar file. The "nogui" argument appended at the end serves to prevent the Minecraft graphical user interface from appearing. Given that you'll be utilizing the console window, the GUI is unnecessary and consumes additional resources. However, as stated on the Mojang download/server page, if you prefer to start the server with its default GUI, you can omit the "nogui" argument.
Moreover, if you decide to allocate more memory to the server, you can adjust the minimum and maximum values to 2048MB or any multiple of 1024. Many users find 2048MB to be an optimal choice. In such instances, the command would be modified as follows: java -Xmx2048M -Xms2048M -jar minecraft_server.1.19.3.jar nogui
Please be aware that when you write, copy, paste, hit enter, or type "pause", these actions will pause the processing of the batch file, keeping your command window open for error monitoring. Your code should resemble the following:

- Save your modifications and then close the file.
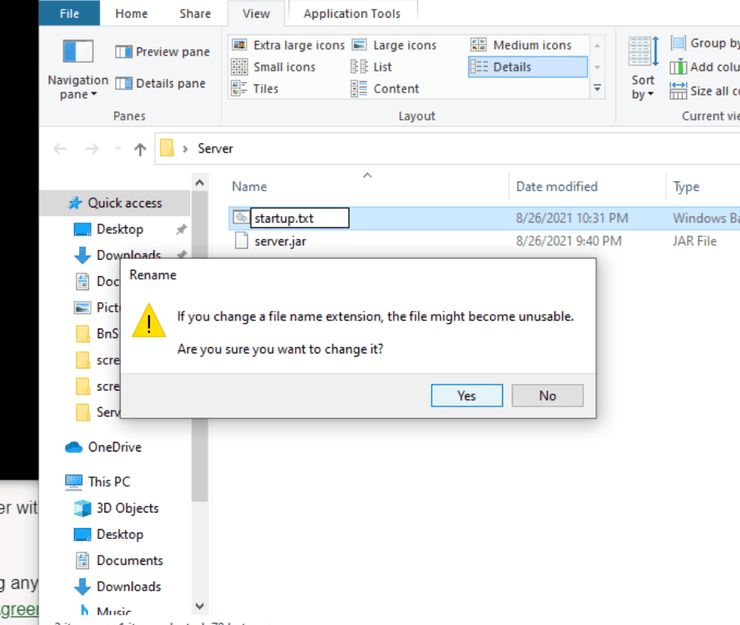
- Click on the name of this text file, and modify the extension. You're aiming for a batch file rather than a text file, so replace the "txt" portion of the file with "bat".
- Press Enter, and Windows may display a warning that altering the extensions could render the file unusable. Disregard this warning and click "Yes".
Congratulations! You've successfully created your own batch file, which means you've also crafted a convenient icon to launch your Minecraft server. Now, it's time to put it to the test and see it in action!
Edit the EULA & Connect
- Double-click the "startup.bat" file, or whatever name you've chosen for it. If everything is correctly configured and up to date, additional files appear in the server folder, including the EULA, logs, and server properties. Once the command window appears, you can close it.
- Right-click on the EULA file and choose "Edit". To proceed, you must agree to the End User License Agreement (EULA). To do this, change the "false" value at the end of the document to "true". Save the changes and close the text document.
- Run the batch file again. Windows Firewall may attempt to block network access, but you need this access for the server to function. Ignore the warning and click "Allow Access".
- The command window will display the server preparation process. This may take some time, but the command window will notify you when it is completed. At this point, the server should be ready to connect to.
- Launch Minecraft Java Edition.
- Navigate to the Multiplayer tab and select "Add Server".
- Enter the hosting computer's IP address or simply type "localhost" into the server address bar.
How to Make a Minecraft Server: Conclusion
You're all set up and connected! If you want to enjoy the game with friends or invite others to join your server, you'll need to share the Minecraft server's IP address with them. Just be aware that sharing the IP address carries some risks, particularly regarding online safety. If you're a cautious parent creating a secure online space for your children, you might want to consider stopping here. However, if your goal is to build a community and you're comfortable with the risks, you can explore port forwarding your router. This will enable people outside your local network to connect to your server. Regardless of your choice, your Minecraft server is now operational, so jump in and start having fun!
>>> Read more: 8 Minecraft Minigames Servers To Check Out in 2024


Comments